
Welcome to our mini series on getting started with programming in Swift!
In this series, you’ll learn some of the basics of programming while working in a modern, friendly environment with the Swift programming language.
Instead of boring you with a lot of theory, we’re going to get you coding right away by using Xcode playgrounds, which are sandbox-type environments where you can run code directly without having to code an entire app.
For this tutorial, you’ll need Xcode 8, the standard development environment for macOS, available here. If you have Xcode version 7 or below, some of the code in this tutorial won’t work as expected.
Getting Started
The set of tools you use to write software is often referred to as the toolchain. The part of the toolchain into which you write your code is known as theIntegrated Development Environment (IDE). Xcode is your IDE, which includes playgrounds.
You’ll use playgrounds throughout this series to practice coding, so it’s important to understand how they work. That’s what you’ll learn during the rest of this tutorial.
Creating a Playground
When you open Xcode, it will greet you with the following welcome screen:

If you don’t see this screen, it’s most likely because the “Show this window when Xcode launches” option was unchecked. You can also open the screen by pressing Command-Shift-1 or clicking Window\Welcome to Xcode from the menu bar.
From the welcome screen, you can jump quickly into a playground by clicking on Get started with a playground. Click on that now and Xcode will take you to a new screen:

From here, you can name the playground and select your desired platform. The name is merely cosmetic and for your own use; when you create your playgrounds, feel free to choose names that will help you remember what they’re about.
The second option you can see here is the platform. Currently, this can be either iOS, macOS or tvOS.
The platform you choose simply defines which template Xcode will use to create the playground. Each platform comes with its own environment set up and ready for you to begin playing around with code. For the purposes of this seris, choose whichever you wish. You won’t be writing any platform-specific code; instead, you’ll be learning the core principles of the Swift language.
Once you’ve chosen a name and a platform, click on Next and then save the playground. Xcode then presents you with the playground, like so:

New playgrounds don’t start entirely empty but have some basic starter code to get you going. Don’t worry — you’ll soon learn what this code means.
Playgrounds Overview
At first glance, a playground may look like a rather fancy text editor. Well, here’s some news for you: It is essentially just that!

The above screenshot highlights the first and most important things to know about:
- Source editor: This is the area in which you’ll write your Swift code. It’s much like a text editor such as Notepad or TextEdit. You’ll notice the use of what’s known as a monospace font, meaning all characters are the same width. This makes the code much easier to read and format.
- Results sidebar: This area shows the results of your code. You’ll learn more about how code is executed as you read through the series. The results sidebar will be the main place you’ll look to confirm your code is working as expected.
- Execution control: Playgrounds execute automatically by default, meaning you can write code and immediately see the output. This control allows you to execute the playground again. Holding down the button allows you to switch between automatic execution and manual execution modes.
- Activity viewer: This shows the status of the playground. In the screenshot, it shows that the playground has finished executing and is ready to handle more code in the source editor. When the playground is executing, this viewer will indicate this with a spinner.
- Panel controls: These toggle switches show and hide three panels, one that appears on the left, one on the bottom and one on the right. The panels each display extra information that you may need to access from time to time. You’ll usually keep them hidden, as they are in the screenshot. You’ll learn more about each of these panels as you move through the series.
Playgrounds execute the code in the source editor from top to bottom. Every time you change the code, the playground will re-execute everything. You can also force a re-execution by clicking Editor\Execute Playground. Alternatively, you can use the execution control.
You can turn on line numbers on the left side of the source editor by clicking Xcode\Preferences…\Text Editing\Line Numbers. Line numbers can be very useful when you want to refer to parts of your code.
Once the playground execution is finished, Xcode updates the results sidebar to show the results of the corresponding line in the source editor. You’ll see how to interpret the results of your code as you work through the examples in this series.
Code comments, arithmetic operations, constants and variables are some of the fundamental building blocks of any language, and Swift is no different.
Code Comments
The Swift compiler generates executable code from your source code. To accomplish this, it uses a detailed set of rules. Sometimes these details can obscure the big picture of why you wrote your code a certain way or even what problem you are solving. To prevent this, it’s good to document what you wrote so that the next human who passes by will be able to make sense of your work. That next human, after all, may be a future you! :]
Swift, like most other programming languages, allows you to document your code through the use of what are calledcomments. These allow you to write any text directly along side your code, which is ignored by the compiler.
The first way to write a comment is like so:
// This is a comment. It is not executed.
|
This is a single line comment. You could stack these up like so to allow you to write paragraphs:
// This is also a comment.
// Over multiple lines.
|
However, there is a better way to write comments which span multiple lines. Like so:
/* This is also a comment.
   Over many..
   many...
   many lines. */
|
This is a multi-line comment. The start is denoted by /* and the end is denoted by */. Simple!
You should use code comments where necessary to document your code, explain your reasoning, or simply to leave jokes for your colleagues. :]
Printing Out
It’s also useful to see the results of what your code is doing. In Swift, you can achieve this through the use of the printcommand.
print will output whatever you want to the debug area (sometimes referred to as the console).
For example, consider the following code:
print("Hello, Swift Apprentice reader!")
|
This will output a nice message to the debug area, like so:

You can hide or show the debug area using the button highlighted with the red box in the picture above. You can also click View\Debug Area\Show Debug Area to do the same thing.
Arithmetic Operations
When you take one or more pieces of data and turn them into another piece of data, this is known as an operation.
The simplest way to understand operations is to think about arithmetic. The addition operation takes two numbers and converts them into the sum of the two numbers. The subtraction operation takes two numbers and converts them into the difference of the two numbers.
You’ll find simple arithmetic all over your apps; from tallying the number of “likes” on a post, to calculating the correct size and position of a button or a window, numbers are indeed everywhere!
In this section, you’ll learn about the various arithmetic operations that Swift has to offer by considering how they apply to numbers. In later parts, you see operations for types other than numbers.
Simple Operations
All operations in Swift use a symbol known as the operator to denote the type of operation they perform.
Consider the four arithmetic operations you learned in your early school days: addition, subtraction, multiplication and division. For these simple operations, Swift uses the following operators:
- Add:
+
- Subtract:
-
- Multiply:
*
- Divide:
/
These operators are used like so:
2 + 6

10 - 2

2 * 4

24 / 3
|
Each of these lines is what is known as an expression. An expression has a value. In these cases, all four expressions have the same value: 8. You write the code to perform these arithmetic operations much as you would write it if you were using pen and paper.

In your playground, you can see the values of these expressions in the right-hand bar, known as the results sidebar, like so:

If you want, you can remove the white space surrounding the operator:
Removing the whitespace is an all or nothing thing: you can’t mix styles. For example:
2+6   // OK
2 + 6 // OK
2 +6  // ERROR
2+ 6  // ERROR
|
It’s often easier to read expressions if you have white space on either side of the operator.
Decimal Numbers
All of the operations above have used whole numbers, more formally known as integers. However, as you will know, not every number is whole.
As an example, consider the following:
This, you may be surprised to know, results in the number 3. This is because if you only use integers in your expression, Swift makes the result an integer also. In this case, the result is rounded down to the next integer.
You can tell Swift to use decimal numbers by changing it to the following:
This time, the result is 3.142857142857143 as expected.
The Remainder Operation
The four operations you’ve seen so far are easy to understand because you’ve been doing them for most of your life. Swift also has more complex operations you can use, all of them standard mathematical operations, just less common ones. Let’s turn to them now.
The first of these is the remainder operation, also called the modulo operation. In division, the denominator goes into the numerator a whole number of times, plus a remainder. This remainder is exactly what the remainder operation gives. For example, 10 modulo 3 equals 1, because 3 goes into 10 three times, with a remainder of 1.
In Swift, the remainder operator is the % symbol, and you use it like so:
In this case, the result equals 8, because 10 goes into 28 twice with a remainder of 8.
Shift Operations
The shift left and shift right operations take the binary form of a decimal number and shift the digits left or right, respectively. Then they return the decimal form of the new binary number.
For example, the decimal number 14 in binary, padded to 8 digits, is 00001110. Shifting this left by two places results in00111000, which is 56 in decimal.
Here’s an illustration of what happens during this shift operation:

The digits that come in to fill the empty spots on the right become 0. The digits that fall off the end on the left are lost.
Shifting right is the same, but the digits move to the right.
The operators for these two operations are as follows:
- Shift left:
<<
- Shift right:
>>
These are the first operators you’ve seen that contain more than one character. Operators can contain any number of characters, in fact.
Here’s an example that uses both of these operators:
Both of these values equal the number 8.
One reason for using shifts is to make multiplying or dividing by powers of two easy. Notice that shifting left by one is the same as multiplying by two, shifting left by two is the same as multiplying by four, and so on. Likewise, shifting right by one is the same as dividing by two, shifting right by two is the same as dividing by four, and so on.
In the old days, code often made use of this trick because shifting bits is much simpler for a CPU to do than complex multiplication and division arithmetic. Therefore the code was quicker if it used shifting. However these days, CPUs are much faster and compilers can even convert multiplication and division by powers of two into shifts for you. So you’ll see shifting only for binary twiddling, which you probably won’t see unless you become an embedded systems programmer!
Order of Operations
Of course, it’s likely that when you calculate a value, you’ll want to use multiple operators. Here’s an example of how to do this in Swift:
((8000 / (5 * 10)) - 32) >> (29 % 5)
|
Notice the use of parentheses, which in Swift serve two purposes: to make it clear to anyone reading the code — including yourself — what you meant, and to disambiguate. For example, consider the following:
Does this equal 72 (350 divided by 5, plus 2) or 50 (350 divided by 7)? Those of you who paid attention in school will be screaming “72!” And you would be right!
Swift uses the same reasoning and achieves this through what’s known as operator precedence. The division operator (/) has a higher precedence than the addition operator (+), so in this example, the code executes the division operation first.
If you wanted Swift to do the addition first — that is, to return 50 — then you could use parentheses like so:
The precedence rules follow the same that you learned in math at school. Multiply and divide have the same precedence, higher than add and subtract which also have the same precedence.
Math functions
Swift also has a vast range of math functions for you to use when necessary. You never know when you need to pull out some trigonometry, especially when you’re a pro Swift-er and writing those complex games!
Note: Not all of these functions are part of Swift. Some are provided by the operating system. Don’t remove the import statement that comes as part of the playground template or Xcode will tell you it can’t find these functions.
For example, consider the following:
sin(45 * Double.pi / 180)
// 0.7071067811865475

cos(135 * Double.pi / 180)
// -0.7071067811865475
|
These compute the sine and cosine respectively. Notice how both make use of Double.pi which is a constant Swift provides us, ready-made with pi to as much precision as is possible by the computer. Neat!
Then there’s this:
sqrt(2.0)
// 1.414213562373095
|
This computes the square root of 2. Did you know that sin(45°) equals 1 over the square root of 2?
Note: Notice how you used 2.0 instead of 2 in the example above? Functions that are provided by the operating systems (like sqrt, sin and cos) are picky and accept only numbers that contain a decimal point.
Not to mention these would be a shame:
max(5, 10)
// 10

min(-5, -10)
// -10
|
These compute the maximum and minimum of two numbers respectively.
If you’re particularly adventurous you can even combine these functions like so:
max(sqrt(2.0), Double.pi / 2)
// 1.570796326794897
|
Naming Data
At its simplest, computer programming is all about manipulating data. Remember, everything you see on your screen can be reduced to numbers that you send to the CPU. Sometimes you yourself represent and work with this data as various types of numbers, but other times the data comes in more complex forms such as text, images and collections.
In your Swift code, you can give each piece of data a name you can use to refer to it later. The name carries with it an associated type that denotes what sort of data the name refers to, such as text, numbers, or a date.
You’ll learn about some of the basic types in this part, and you’ll encounter many other types throughout the rest of this series.
Constants
Take a look at this:
This declares a constant called number which is of type Int. Then it sets the value of the constant to the number 10.
Note: Thinking back to operators, here’s another one. The equals sign, =, is known as the assignment operator.
The type Int can store integers. The way you store decimal numbers is like so:
This is similar to the Int constant, except the name and the type are different. This time, the constant is a Double, a type that can store decimals with high precision.
There’s also a type called Float, short for floating point, that stores decimals with lower precision than Double. In fact,Double has about double the precision of Float, which is why it’s called Double in the first place. A Float takes up less memory than a Double but generally, memory use for numbers isn’t a huge issue and you’ll see Double used in most places.
Once you’ve declared a constant, you can’t change its data. For example, consider the following code:
let number: Int = 10
number = 0
|
This code produces an error:
Cannot assign to value: 'number' is a 'let' constant
In Xcode, you would see the error represented this way:

Constants are useful for values that aren’t going to change. For example, if you were modeling an airplane and needed to keep track of the total number of seats available, you could use a constant.
You might even use a constant for something like a person’s age. Even though their age will change as their birthday comes, you might only be concerned with their age at this particular instant.
Variables
Often you want to change the data behind a name. For example, if you were keeping track of your bank account balance with deposits and withdrawals, you might use a variable rather than a constant.
If your program’s data never changed, then it would be a rather boring program! But as you’ve seen, it’s not possible to change the data behind a constant.
When you know you’ll need to change some data, you should use a variable to represent that data instead of a constant. You declare a variable in a similar way, like so:
var variableNumber: Int = 42
|
Only the first part of the statement is different: You declare constants using let, whereas you declare variables usingvar.
Once you’ve declared a variable, you’re free to change it to whatever you wish, as long as the type remains the same. For example, to change the variable declared above, you could do this:
var variableNumber: Int = 42
variableNumber = 0
variableNumber = 1_000_000
|
To change a variable, you simply assign it a new value.
Note: In Swift, you can optionally use underscores to make larger numbers more human-readable. The quantity and placement of the underscores is up to you.
This is a good time to take a closer look at the results sidebar of the playground. When you type the code above into a playground, you’ll see that the results sidebar on the right shows the current value of variableNumber at each line:

The results sidebar will show a relevant result for each line if one exists. In the case of a variable or constant, the result will be the new value, whether you’ve just declared a constant, or declared or reassigned a variable.
Using Meaningful Names
Always try to choose meaningful names for your variables and constants. Good names can acts as documentation and make your code easy to read.
A good name specifically describes what the variable or constant represents. Here are some examples of good names:
personAgenumberOfPeoplegradePointAverage
Often a bad name is simply not descriptive enough. Here are some examples of bad names:
The key is to ensure that you’ll understand what the variable or constant refers to when you read it again later. Don’t make the mistake of thinking you have an infallible memory! It’s common in computer programming to look back at your own code as early as a day or two later and have forgotten what it does. Make it easier for yourself by giving your variables and constants intuitive, precise names.
Also, note how the names above are written. In Swift, it is common to camel case names. For variables and constants, follow these rules to properly case your names:
- Start with a lowercase letter.
- If the name is made up of multiple words, join them together and start every other word with an uppercase letter.
- If one of these words is an abbreviation, write the entire abbreviation in the same case (e.g.:
sourceURL andurlDescription)
In Swift, you can even use the full range of Unicode characters. For example, you could declare a variable like so:
That might make you laugh, but use caution with special characters like these. They are harder to type and therefore may end up causing you more pain than amusement.

Special characters like these probably make more sense in data that you store rather than in Swift code.
Increment and Decrement
A common operation that you will need is to be able to increment or decrement a variable. In Swift, this is achieved like so:
var counter: Int = 0

counter += 1
// counter = 1

counter -= 1
// counter = 0
|
The counter variable begins as 0. The increment sets its value to 1, and then the decrement sets its value back to 0.
These operators are similar to the assignment operator (=), except they also perform an addition or subtraction. They take the current value of the variable, add or subtract the given value and assign the result to the variable.
In other words, the code above is shorthand for the following:
var counter: Int = 0
counter = counter + 1
counter = counter - 1
|
Similarly, the *= and /= operators do the equivalent for multiplication and division, respectively:
var counter: Int = 10

counter *= 3  // same as counter = counter * 3
// counter = 30

counter /= 2  // same as counter = counter / 2
// counter = 15
|
Mini-exercises
If you haven’t been following along with the code in Xcode, now’s the time to create a new playground and try some exercises to test yourself!
- Declare a constant of type
Int called myAge and set it to your age.
- Declare a variable of type
Double called averageAge. Initially, set it to your own age. Then, set it to the average of your age and my own age of 30.
- Create a constant called
testNumber and initialize it with whatever integer you’d like. Next, create another constant called evenOdd and set it equal to testNumber modulo 2. Now change testNumber to various numbers. What do you notice about evenOdd?
- Create a variable called
answer and initialize it with the value 0. Increment it by 1. Add 10 to it. Multiply it by 10. Then, shift it to the right by 3. After all of these operations, what’s the answer?
Key Points
- Code comments are denoted by a line starting with
// or multiple lines bookended with /* and */.
- Code comments can be used to document your code.
- You can use
print to write things to the debug area.
- The arithmetic operators are:
Add: +
Subtract: -
Multiply: *
Divide: /
Remainder: %
|
- Constants and variables give names to data.
- Once you’ve declared a constant, you can’t change its data, but you can change a variable’s data at any time.
- Always give variables and constants meaningful names to save yourself and your colleagues headaches later.
- Operators to perform arithmetic and then assign back to the variable:
Add and assign: +=
Subtract and assign: -=
Multiply and assign: *=
Divide and assign: /=
|
Challenges
Before moving on, here are some challenges to test your knowledge of variables and constants. You can try the code in a playground to check your answers.
- Declare a constant
exercises with value 11 and a variable exercisesSolved with value 0. Increment this variable every time you solve an exercise (including this one).
- Given the following code:
age = 16
print(age)
age = 30
print(age)
|
Declare age so that it compiles. Did you use var or let?
- Consider the following code:
let a: Int = 46
let b: Int = 10
|
Work out what answer equals when you replace the final line of code above with each of these options:
// 1
let answer1: Int = (a * 100) + b
// 2
let answer2: Int = (a * 100) + (b * 100)
// 3
let answer3: Int = (a * 100) + (b / 10)
|
- Add parentheses to the following calculation. The parentheses should show the order in which the operations are performed and should not alter the result of the calculation.
- Declare two constants
a and b of type Double and assign both a value. Calculate the average of a and b and store the result in a constant named average.
- A temperature expressed in °C can be converted to °F by multiplying by 1.8 then incrementing by 32. In this challenge, do the reverse: convert a temperature from °F to °C. Declare a constant named
fahrenheit of typeDouble and assign it a value. Calculate the corresponding temperature in °C and store the result in a constant named celcius.
- Suppose the squares on a chessboard are numbered left to right, top to bottom, with 0 being the top-left square and 63 being the bottom-right square. Rows are numbered top to bottom, 0 to 7. Columns are numbered left to right, 0 to 7. Declare a constant
position and assign it a value between 0 and 63. Calculate the corresponding row and column numbers and store the results in constants named row and column.
- Declare constants named
dividend and divisor of type Double and assign both a value. Calculate the quotient and remainder of an integer division of dividend by divisor and store the results in constants named quotient andremainder. Calculate the remainder without using the operator %.
- A circle is made up of 2 radians, corresponding with 360 degrees. Declare a constant
degrees of type Double and assign it an initial value. Calculate the corresponding angle in radians and store the result in a constant namedradians.
- Declare four constants named
x1, y1, x2 and y2 of type Double. These constants represent the 2-dimensional coordinates of two points. Calculate the distance between these two points and store the result in a constant named distance.
- Increment variable
exercisesSolved a final time. Use the print function to print the percentage of exercises you managed to solve. The printed result should be a number between 0 and 1.
Where to Go From Here?
You can download the final playground from this part — along with the solutions for the challenges above — from this link.
In this tutorial, you’ve only dealt with only numbers, both integers and decimals. Of course, there’s more to the world of code than that! In the next part, you’re going to learn about more types such as strings, which allow you to store text.
The next part in this tutorial series deals with types and operations; continue on to Part 2: Types and Operations to carry on with your Swift adventures!
We encourage you to try the challenges above; if you find a particularly interesting solution to one of the challenges, or have any questions or comments on this tutorial, please tell us about it in the discussion below!
This tutorial was taken from Chapters 1 and 2 of Swift Apprentice, Second Edition available from the raywenderlich.com store.
The book has been completely updated to work with Xcode 8 and Swift 3. Check it out and let us know what you think!

Welcome to the second part of this learning Swift mini-series!
This part carries on from Part 1: Expressions, Variables & Constants. We recommend you start with the first part of this tutorial series to get the most out of it.
Now that you know how to perform basic operations and manipulate data using operations, it’s time to learn more about types. Formally, a type describes a set of values and the operations that can be performed them.
In this tutorial, you’ll learn about handling different types, including strings which allow you to represent text. You’ll learn about converting between types, and you’ll also be introduced to type inference which makes your life as a programmer a lot simpler.
Finally, you’ll learn about tuples which allow you to make your own types made up of multiple values of any type.
Getting Started
Sometimes you’ll have data in one format and need to convert it to another. The naïve way to attempt this would be like so:
var integer: Int = 100
var decimal: Double = 12.5
integer = decimal
|
Swift will complain if you try to do this and spit out an error on the third line:
Cannot assign value of type 'Double' to type 'Int'
Some programming languages aren’t as strict and will perform conversions like this automatically. Experience shows this kind of automatic conversion is the source of software bugs and often hurts performance. Swift disallows you from assigning a value of one type to another and avoids these issues.
Remember, computers rely on us programmers to tell them what to do. In Swift, that includes being explicit about type conversions. If you want the conversion to happen, you have to say so!
Instead of simply assigning, you need to explicitly say that you want to convert the type. You do it like so:
var integer: Int = 100
var decimal: Double = 12.5
integer = Int(decimal)
|
The assignment on the third line now tells Swift unequivocally that you want to convert from the original type, Double, to the new type, Int.
Note: In this case, assigning the decimal value to the integer results in a loss of precision: The integer variable ends up with the value 12 instead of 12.5. This is why it’s important to be explicit. Swift wants to make sure you know what you’re doing and that you may end up losing data by performing the type conversion.
Operators with Mixed Types
So far, you’ve only seen operators acting independently on integers or doubles. But what if you have an integer that you want to multiply by a double?
You might think you could do it like this:
let hourlyRate: Double = 19.5
let hoursWorked: Int = 10
let totalCost: Double = hourlyRate * hoursWorked
|
If you try that, you’ll get an error on the final line:
Binary operator '*' cannot be applied to operands of type 'Double' and 'Int'
This is because in Swift, you can’t apply the * operator to mixed types. This rule also applies to the other arithmetic operators. It may seem surprising at first, but Swift is being rather helpful.
Swift forces you to be explicit about what you mean when you want an Int multiplied by a Double, because the result can be only one type. Do you want the result to be an Int, converting the Double to an Int before performing the multiplication? Or do you want the result to be a Double, converting the Int to a Double before performing the multiplication?
In this example, you want the result to be a Double. You don’t want an Int, because in that case, Swift would convert the hourlyRate constant into an Int to perform the multiplication, rounding it down to 19 and losing the precision of the Double.
You need to tell Swift you want it to consider the hoursWorked constant to be a Double, like so:
let hourlyRate: Double = 19.5
let hoursWorked: Int = 10
let totalCost: Double = hourlyRate * Double(hoursWorked)
|
Now, each of the operands will be a Double when Swift multiplies them, so totalCost is a Double as well.
Type Inference
Up to this point, each time you’ve seen a variable or constant declared it’s been accompanied by an associated type, like this:
let integer: Int = 42
let double: Double = 3.14159
|
You may be asking yourself why you need to bother writing the : Int and : Double, since the right hand side of the assignment is already an Int or a Double. It’s redundant, to be sure; your crazy-clever brain can see this without too much work.
It turns out the Swift compiler can deduce this as well. It doesn’t need you to tell it the type all the time — it can figure it out on its own. This is done through a process called type inference. Not all programming languages have this, but Swift does, and it’s a key component of Swift’s power as a language.
So, you can simply drop the type in most places where you see one.
For example, consider the following constant declaration:
Sometimes it’s useful to check the inferred type of a variable or constant. You can do this in a playground by holding down the Option key and clicking on the variable or constant’s name. Xcode will display a popover like this:

Xcode tells you the inferred type by giving you the declaration you would have had to use if there were no type inference. In this case, the type is Int.
It works for other types, too:
let typeInferredDouble = 3.14159
|
Option-clicking on this reveals the following:

You can see from this that type inference isn’t magic. Swift is simply doing what your brain does very easily. Programming languages that don’t use type inference can often feel verbose, because you need to specify the often obvious type each time you declare a variable or constant.
Sometimes you want to define a constant or variable and ensure it’s a certain type, even though what you’re assigning to it is a different type. You saw earlier how you can convert from one type to another. For example, consider the following:
Here, Swift infers the type of wantADouble as Int. But what if you wanted Double instead?
The first thing you could do is the following:
let actuallyDouble = Double(3)
|
This is like you saw before with type conversion.
Another option would be to not use type inference at all and do the following:
let actuallyDouble: Double = 3
|
There is a third option, like so:
let actuallyDouble = 3 as Double
|
This uses a new keyword you haven’t seen before, as, which also performs a type conversion.
Note: Literal values like
3 don’t have a type. It’s only when using them in an expression or assigning them to a constant or variable that Swift infers a type for them.A literal number value that doesn’t contain a decimal point can be used as an
Int as well as a
Double. This is why you’re allowed to assign the value
3 to constant
actuallyDouble.
Literal number values that do contain a decimal point cannot be integers. This means we could have avoided this entire discussion had we started with
let wantADouble = 3.0
Sorry! :]
Mini-exercises
- Create a constant called
age1 and set it equal to 42. Create a constant called age2 and set it equal to 21. Check using Option-click that the type for both has been inferred correctly as Int.
- Create a constant called
avg1 and set it equal to the average of age1 and age2 using the naïve operation (age1 + age2) / 2. Use Option-click to check the type and check the result of avg1. Why is it wrong?
- Correct the mistake in the above exercise by casting
age1 and age2 to Double in the formula. Use Option-click to check the type and check the result of avg1. Why is it now correct?
Strings
Numbers are essential in programming, but they aren’t the only type of data you need to work with in your apps. Text is also an extremely common data type, such as people’s names, their addresses, or even the words of a book. All of these are examples of text that an app might need to handle.
Most computer programming languages store text in a data type called a string. This part introduces you to strings, first by giving you background on the concept of strings and then by showing you how to use them in Swift.
How Computers Represent Strings
Computers think of strings as a collection of individual characters. All code, in whatever programming language, can be reduced to raw numbers. Strings are no different!
That may sound very strange. How can characters be numbers? At its base, a computer needs to be able to translate a character into the computer’s own language, and it does so by assigning each character a different number. This forms a two-way mapping from character to number that is called a character set.

When you press a character key on your keyboard, you are actually communicating the number of the character to the computer. Your word processor application converts that number into a picture of the character and finally, presents that picture to you.
Unicode
In isolation, a computer is free to choose whatever character set mapping it likes. If the computer wants the letter a to equal the number 10, then so be it. But when computers start talking to each other, they need to use a common character set. If two computers used different character sets, then when one computer transferred a string to the other, they would end up thinking the strings contained different characters.
There have been several standards over the years, but the most modern standard is Unicode. It defines the character set mapping that almost all computers use today.
As an example, consider the word cafe. The Unicode standard tells us that the letters of this word should be mapped to numbers like so:

The number associated with each character is called a code point. So in the example above, c uses code point 99, auses code point 97, and so on.
Of course, Unicode is not just for the simple Latin characters used in English, such as c, a, f and e. It also lets you map characters from languages around the world. The word cafe, as you’re probably aware, is derived from French, in which it’s written as café. Unicode maps these characters like so:

And here’s an example using Chinese characters (this, according to Google translate, means “Computer Programming”):

You’ve probably heard of emojis, which are small pictures you can use in your text. These pictures are, in fact, just normal characters and are also mapped by Unicode. For example:

This is only two characters. The code points for these are very large numbers, but each is still only a single code point. The computer considers these as no different than any other two characters.
Note: The word “emoji” comes from Japanese, where “e” means picture and “moji” means character.
Strings in Swift
Swift, like any good programming language, can work directly with characters and strings. It does so through the data types Character and String, respectively. In this section, you’ll learn about these data types and how to work with them.
Characters and Strings
The Character data type can store a single character. For example:
let characterA: Character = "a"
|
This stores the character a. It can hold any character — even an emoji:
let characterDog: Character = "🐶"
|
But this data type is designed to hold only single characters. The String data type, on the other hand, stores multiple characters. For example:
let stringDog: String = "Dog"
|
It’s as simple as that! The right-hand side of this expression is what’s known as a string literal; it’s the Swift syntax for representing a string.
Of course, type inference applies here as well. If you remove the type in the above declaration, then Swift does the right thing and makes the stringDog a String constant:
let stringDog = "Dog" // Inferred to be of type String
|
Note: There’s no such thing as a character literal in Swift. A character is simply a string of length one. However, Swift infers the type of any string literal to be String, so if you want a Character instead, you must make the type explicit.
Concatenation
You can do much more than create simple strings. Sometimes you need to manipulate a string, and one common way to do so is to combine it with another string.
In Swift, you do this in a rather simple way: by using the addition operator. Just as you can add numbers, you can add strings:
var message = "Hello" + " my name is "
let name = "Matt"
message += name // "Hello my name is Matt"
|
You need to declare message as a variable rather than a constant because you want to modify it. You can add string literals together, as in the first line, and you can add string variables or constants together, as in the last line.
It’s also possible to add characters to a string. However, Swift’s strictness with types means you have to be explicit when doing so, just as you have to be when you work with numbers if one is an Int and the other is a Double.
To add a character to a string, you do this:
let exclamationMark: Character = "!"
message += String(exclamationMark) // "Hello my name is Matt!"
|
With this code, you explicitly convert the Character to a String before you add it to message.
Interpolation
You can also build up a string by using interpolation, which is a special Swift syntax that lets you build a string in a way that’s easy to read:
let name = "Matt"
let message = "Hello my name is \(name)!" // "Hello my name is Matt!"
|
As I’m sure you’ll agree, this is much more readable than the example from the previous section. It’s an extension of the string literal syntax, whereby you replace certain parts of the string with other values. You enclose the value you want to give the string in parentheses preceded by a backslash.
This syntax works in just the same way to build a string from other data types, such as numbers:
let oneThird = 1.0 / 3.0
let oneThirdLongString = "One third is \(oneThird) as a decimal."
|
Here, you use a Double in the interpolation. At the end of this code, your oneThirdLongString constant will contain the following:
One third is 0.3333333333333333 as a decimal.
Of course, it would actually take infinite characters to represent one third as a decimal, because it’s a repeating decimal. String interpolation with a Double gives you no way to control the precision of the resulting string.
This is an unfortunate consequence of using string interpolation; it’s simple to use, but offers no ability to customize the output.
Mini-exercises
- Create a string constant called
firstName and initialize it to your first name. Also create a string constant calledlastName and initialize it to your last name.
- Create a string constant called
fullName by adding the firstName and lastName constants together, separated by a space.
- Using interpolation, create a string constant called
myDetails that uses the fullName constant to create a string introducing yourself. For example, my string would read: "Hello, my name is Matt Galloway.".
Tuples
Sometimes data comes in pairs or triplets. An example of this is a pair of (x, y) coordinates on a 2D grid. Similarly, a set of coordinates on a 3D grid is comprised of an x-value, a y-value and a z-value.
In Swift, you can represent such related data in a very simple way through the use of a tuple.
A tuple is a type that represents data composed of more than one value of any type. You can have as many values in your tuple as you like. For example, you can define a pair of 2D coordinates where each axis value is an integer, like so:
let coordinates: (Int, Int) = (2, 3)
|
The type of coordinates is a tuple containing two Int values. The types of the values within the tuple, in this case Int, are separated by commas surrounded by parentheses. The code for creating the tuple is much the same, with each value separated by commas and surrounded by parentheses.
Type inference can infer tuple types too:
You could similarly create a tuple of Double values, like so:
let coordinates = (2.1, 3.5)
// Inferred to be of type (Double, Double)
|
Or you could mix and match the types comprising the tuple, like so:
let coordinates = (2.1, 3)
// Inferred to be of type (Double, Int)
|
And here’s how to access the data inside a tuple:
let coordinates = (2, 3)
let x = coordinates.0
let y = coordinates.1
|
You can reference each item in the tuple by its position in the tuple, starting with zero. So in this example, x will equal 2and y will equal 3.
Note: Starting with zero is a common practice in computer programming and is called zero indexing.
In the previous example, it may not be immediately obvious that the first value, at index 0, is the x-coordinate and the second value, at index 1, is the y-coordinate. This is another demonstration of why it’s important to always name your variables in a way that avoids confusion.
Fortunately, Swift allows you to name the individual parts of a tuple and you can be explicit about what each part represents. For example:
let coordinatesNamed = (x: 2, y: 3)
// Inferred to be of type (x: Int, y: Int)
|
Here, the code annotates the values of coordinatesNamed to contain a label for each part of the tuple.
Then, when you need to access each part of the tuple, you can access it by its name:
let x = coordinatesNamed.x
let y = coordinatesNamed.y
|
This is much clearer and easier to understand. More often than not, it’s helpful to name the components of your tuples.
If you want to access multiple parts of the tuple at the same time, as in the examples above, you can also use a shorthand syntax to make it easier:
let coordinates3D = (x: 2, y: 3, z: 1)
let (x, y, z) = coordinates3D
|
This declares three new constants, x, y and z, and assigns each part of the tuple to them in turn. The code is equivalent to the following:
let coordinates3D = (x: 2, y: 3, z: 1)
let x = coordinates3D.x
let y = coordinates3D.y
let z = coordinates3D.z
|
If you want to ignore a certain element of the tuple, you can replace the corresponding part of the declaration with an underscore. For example, if you were performing a 2D calculation and wanted to ignore the z-coordinate ofcoordinates3D, then you’d write the following:
let (x, y, _) = coordinates3D
|
This line of code only declares x and y. The _ is special and simply means you’re ignoring this part for now.
Note: You’ll find that you can use the underscore throughout Swift to ignore a value.
Mini-exercises
- Declare a constant tuple that contains three
Int values followed by a Double. Use this to represent a date (month, day, year) followed by an average temperature for that date.
- Change the tuple to name the constituent components. Give them names related to the data that they contain:
month, day, year and averageTemperature.
- In one line, read the day and average temperature values into two constants. You’ll need to employ the underscore to ignore the month and year.
- Up until now, you’ve only seen constant tuples. But you can create variable tuples, too. Change the tuple you created in the exercises above to a variable by using
var instead of let. Now change the average temperature to a new value.
A Whole Lot of Number Types
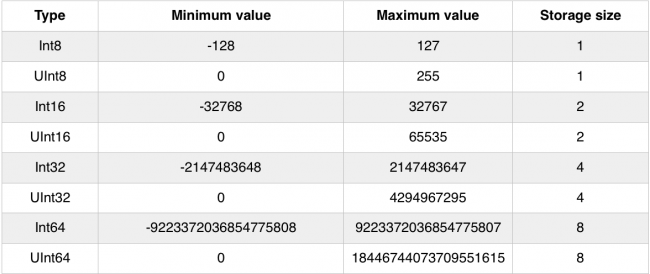
You’ve been using Int to represent whole numbers. An Int is represented with 64-bits on most modern hardware and with 32-bits on older, or more resource constrained systems. Swift provides many more number types that use different amounts of storage. For whole numbers, you can use the explicit signed types Int8, Int16, Int32, Int64. These types consume 1, 2, 4, and 8 bytes of storage respectively. Each of these types use 1-bit to represent the sign.
If you are only dealing with non-negative values there are a set of explicit unsigned types that you can use. These include UInt8, UInt16, UInt32 and UInt64. While you cannot represent negative values with these the extra 1-bit lets you represent values that are twice as big as their signed counterparts.
Here is a summary of the different integer types and their storage characteristics. Most of the time you will just want to use an Int. These become useful if your code is interacting with another piece of software that uses one of these more exact sizes or if you need to optimize for storage size.
You’ve been using Double to represent fractional numbers. Swift offers a Float type which has less range and precision than Double but requires half as much storage. Modern hardware has been optimized for Double so it is the one that you should reach for unless you have good reason not to.

Most of the time you will just use Int and Double to represent numbers but every once in a while you might encounter the other types. You already know how to deal with them. For example, suppose you need to add together an Int16with a UInt8 and an Int32. You can do that like so:
let a: Int16 = 12
let b: UInt8 = 255
let c: Int32 = -100000

let answer = Int(a) + Int(b) + Int(c)  // answer is an Int
|
A Peek Behind the Curtains: Protocols
Even though there are a dozen different numeric types, they are pretty easy to understand and use. This is because they all roughly support the same operations. In other words, once you know how to use an Int, using any one of the flavors is very straight-forward.
One of the truly great features of Swift is how it formalizes the idea of type commonality using what are calledprotocols. By learning a protocol you instantly understand how an entire family of types that use that protocol work.
In the case of integers, the functionality can be diagrammed like so:
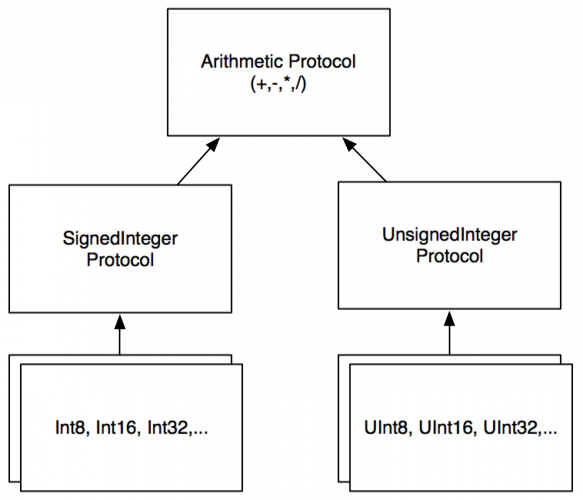
The arrows indicate conformance to (sometimes called adoption of) a protocol. While this graph does not show all of the protocols that integer types conform to, it gives you insight about how things are organized.
Swift is the first protocol-based language. As you begin to understand the protocols that underly the types, you can start leveraging the system in ways not possible with other languages. By the end of this book you will be hooking into existing protocols and even creating new ones of your own.
Key points
- Type casting allows you to convert variables of one type into another.
- Type casting is required when using an operator, such as the basic arithmetic operators (
+, -, *, /), with mixed types.
- Type inference allows you to omit the type when Swift already knows it.
- Unicode is the standard for mapping characters to numbers.
- A single mapping in Unicode is called a code point.
- The
Character data type stores single characters. The String data type stores collections of characters, or strings.
- You can combine strings by using the addition operator.
- You can use string interpolation to build a string in-place.
- You can use tuples to group data into a single data type.
- Tuples can either be unnamed or named. Their elements are accessed with index numbers for unnamed tuples, or programmer given names for named tuples.
- There are many kinds of numeric types with different storage and precision capabilities
- Protocols are how types are organized in Swift
Give the following challenges a try to solidify your knowledge and you’ll be ready to move on!
Challenges
- Create a constant called
coordinates and assign a tuple containing two and three to it.
- Create a constant called
namedCoordinate with a row and column component.
- Which of the following are valid statements?
let character: Character = "Dog"
let character: Character = "🐶"
let string: String = "Dog"
let string: String = "🐶"
|
- Is this valid code?
let tuple = (day: 15, month: 8, year: 2015)
let day = tuple.Day
|
- What is wrong with the following code?
let name = "Matt"
name += " Galloway"
|
- What is the type of the constant called
value?
let tuple = (100, 1.5, 10)
let value = tuple.1
|
- What is the value of the constant called
month?
let tuple = (day: 15, month: 8, year: 2015)
let month = tuple.month
|
- What is the value of the constant called
summary?
let number = 10
let multiplier = 5
let summary = "\(number) multiplied by \(multiplier) equals \(number * multiplier)"
|
- What is the sum of a, b minus c?
let a = 4
let b: Int32 = 100
let c: UInt8 = 12
|
- What is the numeric difference between
Double.pi and Float.pi?
Where to Go From Here?
Types are a fundamental part of programming. They’re what allow you to correctly store your data. You’ve seen a few more here, including strings and tuples as well as a bunch of numeric types. Later on you’ll learn how to define your own types with structs, enums and classes.
You can download the final playgrounds and challenges from this tutorial here.
In the next part, you’ll learn about Boolean logic and simple control flow. This is required for any program to be able to make decisions about how the program should proceed based on the data it’s manipulating. Head on to Part 3: Flow Control to carry on with this series.
We encourage you to try the challenges above; if you find a particularly interesting solution to one of the challenges, or have any questions or comments on this tutorial, please tell us about it in the discussion below!
This tutorial was taken from Chapter 3 of Swift Apprentice, Second Edition available from the raywenderlich.com store.
The book has been completely updated to work with Xcode 8 and Swift 3. Check it out and let us know what you think!
Welcome to the third and final part of this Swift mini-series! If you haven’t read through Part 1 or Part 2 of this series, we suggest you do that first.
When writing a computer program, you need to be able to tell the computer what to do in different scenarios. For example, a calculator app would need to do one thing if the user tapped the addition button and another thing if the user tapped the subtraction button.
In computer-programming terms, this concept is known as control flow. It is so named because the flow of the program is controlled by various methods.
In this tutorial, you’ll learn how to make decisions and repeat tasks in your programs by using syntax to control the flow. You’ll also learn about Booleans, which represent true and false values, and how you can use these to compare data.
Getting Started
You’ve seen a few types now, such as Int, Double and String. Here you’ll learn about another type, one that will let you compare values through the comparison operators.
When you perform a comparison, such as looking for the greater of two numbers, the answer is either true or false. Swift has a data type just for this! It’s called a Bool, which is short for Boolean, after a rather clever man named George Boole who invented an entire field of mathematics around the concept of true and false.
This is how you use a Boolean in Swift:
let yes: Bool = true
let no: Bool = false
|
And because of Swift’s type inference, you can leave off the type:
let yes = true
let no = false
|
A Boolean can only be either true or false, denoted by the keywords true and false. In the code above, you use the keywords to set the initial state of each constant.
Boolean Operators
Booleans are commonly used to compare values. For example, you may have two values and you want to know if they’re equal: either they are (true) or they aren’t (false).
In Swift, you do this using the equality operator, which is denoted by ==:
let doesOneEqualTwo = (1 == 2)
|
Swift infers that doesOneEqualTwo is a Bool. Clearly, 1 does not equal 2, and therefore doesOneEqualTwo will be false.
Similarly, you can find out if two values are not equal using the != operator:
let doesOneNotEqualTwo = (1 != 2)
|
This time, the comparison is true because 1 does not equal 2, so doesOneNotEqualTwo will be true.
The prefix ! operator, also called the not-operator, toggles true to false and false to true. Another way to write the above is:
Because 1 does not equal 2, (1==2) is false, and then ! flips it to true.
Two more operators let you determine if a value is greater than (>) or less than (<) another value. You’ll likely know these from mathematics:
let isOneGreaterThanTwo = (1 > 2)
let isOneLessThanTwo = (1 < 2)
|
And it’s not rocket science to work out that isOneGreaterThanTwo will equal false and isOneLessThanTwo will equaltrue.
There’s also an operator that lets you test if a value is less than or equal to another value: <=. It’s a combination of <and ==, and will therefore return true if the first value is either less than the second value or equal to it.
Similarly, there’s an operator that lets you test if a value is greater than or equal to another — you may have guessed that it’s >=.
Boolean Logic
Each of the examples above tests just one condition. When George Boole invented the Boolean, he had much more planned for it than these humble beginnings. He invented Boolean logic, which lets you combine multiple conditions to form a result.
One way to combine conditions is by using AND. When you AND together two Booleans, the result is another Boolean. If both input Booleans are true, then the result is true. Otherwise, the result is false.
In Swift, the operator for Boolean AND is &&, used like so:
In this case, and will be true. If either of the values on the right was false, then and would be false.
Another way to combine conditions is by using OR. When you OR together two Booleans, the result is true if either of the input Booleans is true. Only if both input Booleans are false will the result be false.
In Swift, the operator for Boolean OR is ||, used like so:
In this case, or will be true. If both values on the right were false, then or would be false. If both were true, then orwould still be true.
In Swift, Boolean logic is usually applied to multiple conditions. Maybe you want to determine if two conditions are true; in that case, you’d use AND. If you only care about whether one of two conditions is true, then you’d use OR.
For example, consider the following code:
let andTrue = 1 < 2 && 4 > 3
let andFalse = 1 < 2 && 3 > 4

let orTrue = 1 < 2 || 3 > 4
let orFalse = 1 == 2 || 3 == 4
|
Each of these tests two separate conditions, combining them with either AND or OR.
It’s also possible to use Boolean logic to combine more than two comparisons. For example, you can form a complex comparison like so:
let andOr = (1 < 2 && 3 > 4) || 1 < 4
|
The parentheses disambiguates the expression. First Swift evaluates the sub-expression inside the parentheses, and then it evaluates the full expression, following these steps:
1. (1 < 2 && 3 > 4) || 1 < 4
2. (true && false) || true
3. false || true
4. true
|
String Equality
Sometimes you want to determine if two strings are equal. For example, a children’s game of naming an animal in a photo would need to determine if the player answered correctly.
In Swift, you can compare strings using the standard equality operator, ==, in exactly the same way as you compare numbers. For example:
let guess = "dog"
let dogEqualsCat = guess == "cat"
|
Here, dogEqualsCat is a Boolean that in this case equals false, because "dog" does not equal "cat". Simple!
Just as with numbers, you can compare not just for equality, but also to determine is one value is greater than or less that another value. For example:
let order = "cat" < "dog"
|
This syntax checks if one string comes before another alphabetically. In this case, order equals true because "cat"comes before "dog".
The subject of equality brings up an interesting feature of Unicode: There are two ways to represent some characters. One example is the é in café, which is an e with an acute accent. You can represent this character with either a single character or with two.
You saw the single character, code point 233, earlier in this tutorial. The two-character case is an e on its own followed by an acute accent combining character, which is a special character that modifies the previous character.
So you can represent the e with an acute accent by either of these means:

The combination of these two characters in the second diagram forms what is known as a grapheme cluster.
Another example of combining characters are the special characters used to change the skin color of certain emojis. For example:

Here, the thumbs up emoji is followed by a skin tone combining character. On platforms that support it, including iOS and macOS, the rendered emoji is a single thumbs up character with the skin tone applied.
Combining characters make equality of strings a little trickier. For example, consider the word café written once using the single é character, and once using the combining character, like so:

These two strings are of course logically equal. When they are printed onscreen, they look exactly the same. But they are represented inside the computer in different ways. Many programming languages would consider these strings to be unequal because those languages work by comparing the characters one by one. Swift, however, considers these strings to be equal by default. Let’s see that in action:
let stringA = "café"
let stringB = "cafe\u{0301}"

let equal = stringA == stringB
|
Note: In the code above, the acute accent combining character is written using the Unicode shorthand, which is \ufollowed by the code point in hexadecimal, in braces. You can use this shorthand to write any Unicode character. I had to use it here for the combining character because there’s no way to type this character on my keyboard!
In this case, equal is true, because the two strings are logically the same.
String comparison in Swift uses a technique known as canonicalization. Say that three times fast! Before checking equality, Swift canonicalizes both strings, which means they’re converted to use the same special character representation.
It doesn’t matter which way it does the canonicalization — using the single character or using the combining character — as long as both strings get converted to the same style. Once the canonicalization is complete, Swift can compare individual characters to check for equality.
Mini-exercises
- Create a constant called
myAge and set it to your age. Then, create a constant called isTeenager that uses Boolean logic to determine if the age denotes someone in the age range of 13 to 19.
- Create another constant called
theirAge and set it to my age, which is 30. Then, create a constant calledbothTeenagers that uses Boolean logic to determine if both you and I are teenagers.
- Create a constant called
reader and set it to your name as a string. Create a constant called author and set it to my name, Matt Galloway. Create a constant called authorIsReader that uses string equality to determine if reader andauthor are equal.
- Create a constant called
readerBeforeAuthor which uses string comparison to determine if reader comes beforeauthor.
The if Statement
The first and most common way of controlling the flow of a program is through the use of an if statement, which allows the program to do something only if a certain condition is true. For example, consider the following:
if 2 > 1 {
  print("Yes, 2 is greater than 1.")
}
|
This is a simple if statement. If the condition is true, then the statement will execute the code between the braces. If the condition is false, then the statement won’t execute the code between the braces. It’s as simple as that!
You can extend an if statement to provide code to run in case the condition turns out to be false. This is known as theelse clause. Here’s an example:
let animal = "Fox"

if animal == "Cat" || animal == "Dog" {
  print("Animal is a house pet.")
} else {
  print("Animal is not a house pet.")
}
|
Here, if animal equals either "Cat" or "Dog", then the statement will run the first block of code. If animal does not equal either "Cat" or "Dog", then the statement will run the block inside the else part of the if statement, printing the following to the debug area:
Animal is not a house pet.
But you can go even further than that with if statements. Sometimes you want to check one condition, then another. This is where else-if comes into play, nesting another if statement in the else clause of a previous if statement.
You can use it like so:
let hourOfDay = 12
let timeOfDay: String

if hourOfDay < 6 {
  timeOfDay = "Early morning"
} else if hourOfDay < 12 {
  timeOfDay = "Morning"
} else if hourOfDay < 17 {
  timeOfDay = "Afternoon"
} else if hourOfDay < 20 {
  timeOfDay = "Evening"
} else if hourOfDay < 24 {
  timeOfDay = "Late evening"
} else {
  timeOfDay = "INVALID HOUR!"
}
print(timeOfDay)
|
These nested if statements test multiple conditions one by one until a true condition is found. Only the code associated with that first true condition is executed, regardless of whether subsequent else-if conditions are true. In other words, the order of your conditions matters!
You can add an else clause at the end to handle the case where none of the conditions are true. This else clause is optional if you don’t need it; in this example you do need it, to ensure that timeOfDay has a valid value by the time you print it out.
In this example, the if statement takes a number representing an hour of the day and converts it to a string representing the part of the day to which the hour belongs. Working with a 24-hour clock, the statements are checked one-by-one in order:
- The first check is to see if the hour is less than 6. If so, that means it’s early morning.
- If the hour is not less than 6, the statement continues to the first
else-if, where it checks the hour to see if it’s less than 12.
- Then in turn, as conditions prove false, the statement checks the hour to see if it’s less than 17, then less than 20, then less than 24.
- Finally, if the hour is out of range, the statement prints that information to the console.
In the code above, the hourOfDay constant is 12. Therefore, the code will print the following:
Afternoon
Notice that even though both the hourOfDay < 20 and hourOfDay < 24 conditions are also true, the statement only executes the first block whose condition is true; in this case, the block with the hourOfDay < 17 condition.
Short Circuiting
An important fact about if statements is what happens when there are multiple Boolean conditions separated by ANDs (&&) or ORs (||).
Consider the following code:
if 1 > 2 && name == "Matt Galloway" {
  // ...
}
|
The first condition of the if-statement, 1 > 2 is false. Therefore the whole expression cannot ever be true. So Swift will not even bother to check the second part of the expression, namely the check of name.
Similarly, consider the following code:
if 1 < 2 || name == "Matt Galloway" {
  // ...
}
|
Since 1 < 2 is true, the whole expression must be true as well. Therefore once again, the check of name is not executed.
This will come in handy later on when you start dealing with more complex data types.
Encapsulating Variables
if statements introduce a new concept scope, which is a way to encapsulate variables through the use of braces.
Let’s take an example. Imagine you want to calculate the fee to charge your client. Here’s the deal you’ve made:
You earn $25 for every hour up to 40 hours, and $50 for every hour thereafter.
Using Swift, you can calculate your fee in this way:
var hoursWorked = 45

var price = 0
if hoursWorked > 40 {
  let hoursOver40 = hoursWorked - 40
  price += hoursOver40 * 50
  hoursWorked -= hoursOver40
}
price += hoursWorked * 25

print(price)
|
This code takes the number of hours and checks if it’s over 40. If so, the code calculates the number of hours over 40 and multiplies that by $50, then adds the result to the price. The code then subtracts the number of hours over 40 from the hours worked. It multiplies the remaining hours worked by $25 and adds that to the total price.
In the example above, the result is as follows:
1250
The interesting thing here is the code inside the if statement. There is a declaration of a new constant, hoursOver40, to store the number of hours over 40. Clearly, you can use it inside the if statement. But what happens if you try to use it at the end of the above code?
...

print(price)
print(hoursOver40)
|
This would result in the following error:
Use of unresolved identifier 'hoursOver40'
This error informs you that you’re only allowed to use the hoursOver40 constant within the scope in which it was created. In this case, the if statement introduced a new scope, so when that scope is finished, you can no longer use the constant.
However, each scope can use variables and constants from its parent scope. In the example above, the scope inside of the if statement uses the price and hoursWorked variables, which you created in the parent scope.
The Ternary Conditional Operator
Now I want to introduce a new operator, one you didn’t see in the previous tutorial. It’s called the ternary conditional operator and it’s related to if statements.
If you wanted to determine the minimum and maximum of two variables, you could use if statements, like so:
let a = 5
let b = 10

let min: Int
if a < b {
  min = a
} else {
  min = b
}

let max: Int
if a > b {
  max = a
} else {
  max = b
}
|
By now you know how this works, but it’s a lot of code. Wouldn’t it be nice if you could shrink this to just a couple of lines? Well, you can, thanks to the ternary conditional operator!
The ternary conditional operator takes a condition and returns one of two values, depending on whether the condition was true or false. The syntax is as follows:
(<CONDITION>) ? <TRUE VALUE> : <FALSE VALUE>
|
You can use this operator to rewrite your long code block above, like so:
let a = 5
let b = 10

let min = a < b ? a : b
let max = a > b ? a : b
|
In the first example, the condition is a < b. If this is true, the result assigned back to min will be the value of a; if it’s false, the result will be the value of b.
I’m sure you agree that’s much simpler! This is a useful operator that you’ll find yourself using regularly.
Note: Because finding the greater or smaller of two numbers is such a common operation, the Swift standard library provides two functions for this purpose: max and min. If you were paying attention earlier in this series, then you’ll recall you’ve already seen these.
Mini-exercises
- Create a constant called
myAge and initialize it with your age. Write an if statement to print out Teenager if your age is between 13 and 19, and Not a teenager if your age is not between 13 and 19.
- Create a constant called
answer and use a ternary condition to set it equal to the result you print out for the same cases in the above exercise. Then print out answer.
Loops
Loops are Swift’s way of executing code multiple times. In this section, you’ll learn about one type of loop, the whileloop. If you know another programming language, you’ll find the concepts and maybe even the syntax to be familiar.
While Loops
A while loop repeats a block of code while a condition is true.
You create a while loop this way:
while <CONDITION> {
  <LOOP CODE>
}
|
Every iteration, the loop checks the condition. If the condition is true, then the loop executes and moves on to another iteration. If the condition is false, then the loop stops. Just like if statements, while loops introduce a scope.
The simplest while loop takes this form:
This is a while loop that never ends because the condition is always true. Of course, you would never write such awhile loop, because your program would spin forever! This situation is known as an infinite loop, and while it might not cause your program to crash, it will very likely cause your computer to freeze.

Here’s a more useful example of a while loop:
var sum = 1

while sum < 1000 {
  sum = sum + (sum + 1)
}
|
This code calculates a mathematical sequence, up to the point where the value is greater than 1000.
The loop executes as follows:
- Before iteration 1:
sum = 1, loop condition = true
- After iteration 1:
sum = 3, loop condition = true
- After iteration 2:
sum = 7, loop condition = true
- After iteration 3:
sum = 15, loop condition = true
- After iteration 4:
sum = 31, loop condition = true
- After iteration 5:
sum = 63, loop condition = true
- After iteration 6:
sum = 127, loop condition = true
- After iteration 7:
sum = 255, loop condition = true
- After iteration 8:
sum = 511, loop condition = true
- After iteration 9:
sum = 1023, loop condition = false
After the ninth iteration, the sum variable is 1023, and therefore the loop condition of sum < 1000 becomes false. At this point, the loop stops.
Repeat-while Loops
A variant of the while loop is called the repeat-while loop. It differs from the while loop in that the condition is evaluated at the end of the loop rather than at the beginning.
You construct a repeat-while loop like this:
repeat {
  <LOOP CODE>
} while <CONDITION>
|
Here’s the example from the last section, but using a repeat-while loop:
var sum = 1

repeat {
  sum = sum + (sum + 1)
} while sum < 1000
|
In this example, the outcome is the same as before. However, that isn’t always the case — you might get a different result with a different condition.
Consider the following while loop:
var sum = 1

while sum < 1 {
  sum = sum + (sum + 1)
}
|
And now consider the corresponding repeat-while loop, which uses the same condition:
var sum = 1

repeat {
  sum = sum + (sum + 1)
} while sum < 1
|
In the case of the regular while loop, the condition sum < 1 is false right from the start. That means the body of the loop won’t be reached! The value of sum will equal 1 because the loop won’t execute any iterations.
In the case of the repeat-while loop, however, sum will equal 3 because the loop will execute once.
Breaking Out of a Loop
Sometimes you want to break out of a loop early. You can do this using the break statement, which immediately stops the execution of the loop and continues on to the code after the loop.
For example, consider the following code:
var sum = 1

while true {
  sum = sum + (sum + 1)
  if sum >= 1000 {
    break
  }
}
|
Here, the loop condition is true, so the loop would normally iterate forever. However, the break means the while loop will exit once the sum is greater than or equal to 1000. Neat!
You’ve seen how to write the same loop in different ways, demonstrating that in computer programming, there are often many ways to achieve the same result. You should choose the method that’s easiest to read and conveys your intent in the best way possible. This is an approach you’ll internalize with enough time and practice.
Mini-exercises
- Create a variable named
counter and set it equal to 0. Create a while loop with the condition counter < 10 which prints out counter is X (where X is replaced with counter value) and then increments counter by 1.
- Create a variable named
counter and set it equal to 0. Create another variable named roll and set it equal to 0. Create a repeat-while loop. Inside the loop, set roll equal to Int(arc4random_uniform(6)) which means to pick a random number between 0 and 5. Then increment counter by 1. Finally, print After X rolls, roll is Y where Xis the value of counter and Y is the value of roll. Set the loop condition such that the loop finishes when the first 0is rolled.
Key Points
- You use the Boolean data type
Bool to represent true and false.
- The comparison operators, all of which return a Boolean, are:
Equal: ==
Not equal: !=
Less than: <
Greater than: >
Less than or equal: <=
Greater than or equal: >=
|
- You can use Boolean logic to combine comparison conditions.
- Swift’s use of canonicalization ensures that the comparison of strings accounts for combining characters.
- You use
if statements to make simple decisions based on a condition.
- You use
else and else-if within an if statement to extend the decision-making beyond a single condition.
- Short circuiting ensures that only the minimal required parts of a Boolean expression are evaluated.
- You can use the ternary operator in place of simple
if statements.
- Variables and constants belong to a certain scope, beyond which you cannot use them. A scope inherits visible variables and constants from its parent.
- While loops allow you to perform a certain task a number of times until a condition is met.
- The break statement lets you break out of a loop.
First Challenges
Here are a few challenges before you head into the next section on advanced control flow:
- What’s wrong with the following code?
let firstName = "Matt"

if firstName == "Matt" {
  let lastName = "Galloway"
} else if firstName == "Ray" {
  let lastName = "Wenderlich"
}
let fullName = firstName + " " + lastName
|
- In each of the following statements, what is the value of the Boolean
answer constant?
let answer = true && true
let answer = false || false
let answer = (true && 1 != 2) || (4 > 3 && 100 < 1)
let answer = ((10 / 2) > 3) && ((10 % 2) == 0)
|
- Suppose the squares on a chessboard are numbered left to right, top to bottom, with 0 being the top-left square and 63 being the bottom-right square. Rows are numbered top to bottom, 0 to 7. Columns are numbered left to right, 0 to 7. Given a current position on the chessboard, expressed as a row and column number, calculate the next position on the chessboard, again expressed as a row and column number. The ordering is determined by the numbering from 0 to 63. The position after 63 is again 0.
- Given the coefficients a, b and c, calculate the solutions to a quadratic equation with these coefficients. Take into account the different number of solutions (0, 1 or 2). If you need a math refresher, this Wikipedia article on the quadratic equation will help https://en.wikipedia.org/wiki/Quadratic_formula.
- Given a month (represented with a
String in all lowercase) and the current year (represented with an Int), calculate the number of days in the month. Remember that because of leap years, “february” has 29 days when the year is a multiple of 4 but not a multiple of 100. February also has 29 days when the year is a multiple of 400.
- Given a number, determine if this number is a power of 2. (Hint: you can use
log2(number) to find the base 2 logarithm of number. log2(number) will return a whole number if number is a power of two. You can also solve the problem using a loop and no logarithm.)
- Print a table of the first 10 powers of 2.
- Given a number n, calculate the n-th Fibonacci number. (Recall Fibonacci is 1, 1, 2, 3, 5, 8, 13, … Start with 1 and 1 and add these values together to get the next value. The next value is the sum of the previous two. So the next value in this case is 8+13 = 21.)
- Given a number n, calculate the factorial of n. (Example: 4 factorial is equal to 1 * 2 * 3 * 4.)
- Given a number between 2 and 12, calculate the odds of rolling this number using two six-sided dice. Compute it by exhaustively looping through all of the combinations and counting the fraction of outcomes that give you that value. Don’t use a formula.
Advanced Control Flow
In this section, you’ll continue to learn how to control the flow of execution. You’ll learn about another loop known as the for loop.
Loops may not sound very interesting, but they’re very common in computer programs. For example, you might have code to download an image from the cloud; with a loop, you could run that multiple times to download your entire photo library. Or if you have a game with multiple computer-controlled characters, you might need a loop to go through each one and make sure it knows what to do next.
You’ll also learn about switch statements which are particularly powerful in Swift. They allow you to inspect a value and decide what to do based on its value. They’re incredibly powerful when used with some advanced Swift features such as pattern matching.
Ranges
Before you dive into the for loop statement, you need to know about the Range data type, which lets you represent a sequence of numbers. Let’s look at two types of Range.
First, there’s closed range, which you represent like so:
The three dots (...) indicate that this range is closed, which means the range goes from 0 to 5 inclusive. That’s the numbers (0, 1, 2, 3, 4, 5).
Second, there’s half-open range, which you represent like so:
let halfOpenRange = 0..<5
|
Here, you replace the three dots with two dots and a less-than sign (..<). Half-open means the range goes from 0 to 5, inclusive of 0 but not of 5. That’s the numbers (0, 1, 2, 3, 4).
Both open and half-open ranges must always be increasing. In other words, the second number must always be greater than or equal to the first.
Ranges are commonly used in both for loops and switch statements, which means that throughout the rest of this section, you’ll use ranges as well!
For Loops
In the previous section, you looked at while loops. Now that you know about ranges, it’s time to look at another type of loop: the for loop. This is probably the most common loop you’ll see, and you’ll use it to run code a certain number of times.
You construct a for loop like this:
for <CONSTANT> in <RANGE> {
  <LOOP CODE>
}
|
The loop begins with the for keyword, followed by a name given to the loop constant (more on that shortly), followed by in, followed by the range to loop through.
Here’s an example:
let count = 10
var sum = 0

for i in 1...count {
  sum += i
}
|
In the code above, the for loop iterates through the range 1 to count. At the first iteration of the loop, i will equal the first element in the range: 1. Each time around the loop, i will increment until it’s equal to count; the loop will execute one final time and then finish.
Note: If you’d used a half-open range, the the last iteration would see i equal to count - 1.
Inside the loop, you add i to the sum variable; it runs 10 times to calculate the sequence 1 + 2 + 3 + 4 + 5 + ... all the way up to 10.
Here are the values of the constant i and variable sum for each iteration:
- Start of iteration 1:
i = 1, sum = 0
- Start of iteration 2:
i = 2, sum = 1
- Start of iteration 3:
i = 3, sum = 3
- Start of iteration 4:
i = 4, sum = 6
- Start of iteration 5:
i = 5, sum = 10
- Start of iteration 6:
i = 6, sum = 15
- Start of iteration 7:
i = 7, sum = 21
- Start of iteration 8:
i = 8, sum = 28
- Start of iteration 9:
i = 9, sum = 36
- Start of iteration 10:
i = 10, sum = 45
- After iteration 10:
sum = 55
In terms of scope, the i constant is only visible inside the scope of the for loop, which means it’s not available outside of the loop.
Note: If you’re mathematically astute, you might notice that this example computes
triangle numbers. Here’s a quick explanation:
http://bbc.in/1O89TGP
Xcode’s playground gives you a handy way to visualize such an iteration. Hover over the sum += i line in the results pane, and you’ll see a white dot on the right. Hover over that dot to reveal a plus (+) button:
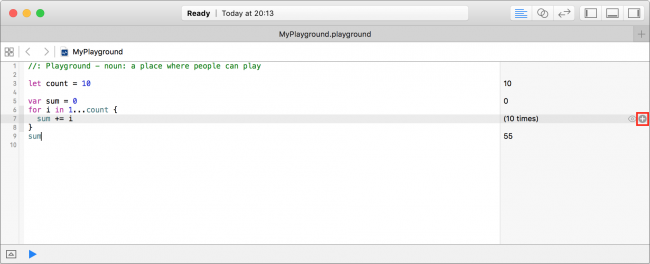
Click this plus (+) button and Xcode will display a graph underneath the line within the playground code editor:
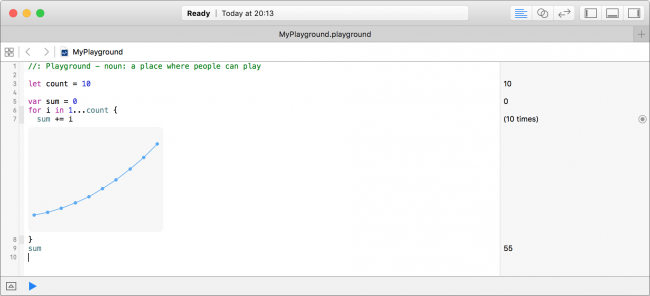
This graph lets you visualize the sum variable as the loop iterates.
Finally, sometimes you only want to loop a certain number of times, and so you don’t need to use the loop constant at all. In that case, you can employ the underscore to indicate you’re ignoring it, like so:
let count = 10
var sum = 1
var lastSum = 0

for _ in 0..<count {
  let temp = sum
  sum = sum + lastSum
  lastSum = temp
}
|
This code doesn’t require a loop constant; the loop simply needs to run a certain number of times. In this case, the range is 0 through count and is half-open. This is the usual way of writing loops that run a certain number of times.
It’s also possible to only perform the iteration under certain conditions. For example, imagine you wanted to compute a sum similar to that of triangle numbers, but only for odd numbers:
let count = 10
var sum = 0
for i in 1...count where i % 2 == 1 {
  sum += i
}
|
The loop above has a where clause in the for loop statement. The loop still runs through all values in the range 1 tocount, but it will only execute the loop’s code block when the where condition is true; in this case, where i is odd.
Continue and Labeled Statements
Sometimes you’d like to skip a loop iteration for a particular case without breaking out of the loop entirely. You can do this with the continue statement, which immediately ends the current iteration of the loop and starts the next iteration.
Note: In many cases, you can use the simpler where clause you just learned about. The continue statement gives you a higher level of control, letting you decide where and when you want to skip an iteration.
Take the example of an 8 by 8 grid, where each cell holds a value of the row multiplied by the column:

It looks much line a multiplication table, doesn’t it?
Let’s say you wanted to calculate the sum of all cells but exclude all even rows, as shown below:

Using a for loop, you can achieve this as follows:
var sum = 0

for row in 0..<8 {
  if row % 2 == 0 {
    continue
  }

  for column in 0..<8 {
    sum += row * column
  }
}
|
When the row modulo 2 equals 0, the row is even. In this case, continue makes the for loop skip to the next row.
Just like break, continue works with both for loops and while loops.
The second code example will calculate the sum of all cells, excluding those where the column is greater than or equal to the row.
To illustrate, it should sum the following cells:

Using a for loop, you can achieve this as follows:
var sum = 0

rowLoop: for row in 0..<8 {
  columnLoop: for column in 0..<8 {
    if row == column {
      continue rowLoop
    }
    sum += row * column
  }
}
|
This last code block makes use of labeled statements, labeling the two loops as rowLoop and the columnLoop, respectively. When the row equals the column inside the inner columnLoop, the outer rowLoop will continue.
You can use labeled statements like these with break to break out of a certain loop. Normally, break and continue work on the innermost loop, so you need to use labeled statements if you want to manipulate an outer loop.
Mini-exercises
- Create a variable called
range and set it equal to a range starting at 1 and ending with 10 inclusive. Write a for loop which iterates over this range and prints the square of each number.
- Write a
for loop which iterates over the same range as in the exercise above and prints the square root of each number. Hint: you will need to type convert your loop variable.
- Above, you saw a
for loop which iterated over only the even rows like so:
var sum = 0
for row in 0..<8 {
  if row % 2 == 0 {
    continue
  }
  for column in 0..<8 {
    sum += row * column
  }
}
|
Change this to use a where clause on the first for loop to skip even rows instead of using continue. Check that the sum is 448 as in the initial example.
Switch Statements
Another way to control flow is through the use of a switch statement, which lets you execute different bits of code depending on the value of a variable or constant.
Here’s a very simple switch statement that acts on an integer:
let number = 10

switch number {
case 0:
  print("Zero")
default:
  print("Non-zero")
}
|
In this example, the code will print the following:
Non-zero
The purpose of this switch statement is to determine whether or not a number is zero. It will get more complex — I promise!
To handle a specific case, you use case followed by the value you want to check for, which in this case is 0. Then, you use default to signify what should happen for all other values.
Here’s another example:
let number = 10

switch number {
case 10:
  print("It's ten!")
default:
  break
}
|
This time you check for 10, in which case, you print a message. Nothing should happen for other values. When you want nothing to happen for a case, or you want the default state to run, you use the break statement. This tells Swift that you meant to not write any code here and that nothing should happen. Cases can never be empty, so you mustwrite some code, even if it’s just a break!
Of course, switch statements also work with data types other than integers. They work with any data type! Here’s an example of switching on a string:
let string = "Dog"

switch string {
case "Cat", "Dog":
  print("Animal is a house pet.")
default:
  print("Animal is not a house pet.")
}
|
This will print the following:
Animal is a house pet.
In this example, you provide two values for the case, meaning that if the value is equal to either "Cat" or "Dog", then the statement will execute the case.
Advanced Switch Statements
You can also give your switch statements more than one case. In the previous section, you saw an if statement using multiple else-if statements to convert an hour of the day to a string describing that part of the day. You could rewrite that more succinctly with a switch statement, like so:
let hourOfDay = 12
let timeOfDay: String

switch hourOfDay {
case 0, 1, 2, 3, 4, 5:
  timeOfDay = "Early morning"
case 6, 7, 8, 9, 10, 11:
  timeOfDay = "Morning"
case 12, 13, 14, 15, 16:
  timeOfDay = "Afternoon"
case 17, 18, 19:
  timeOfDay = "Evening"
case 20, 21, 22, 23:
  timeOfDay = "Late evening"
default:
  timeOfDay = "INVALID HOUR!"
}

print(timeOfDay)
|
This code will print the following:
Afternoon
Remember ranges? Well, you can use ranges to simplify this switch statement. You can rewrite it using ranges as shown below:
let hourOfDay = 12
let timeOfDay: String

switch hourOfDay {
case 0...5:
  timeOfDay = "Early morning"
case 6...11:
  timeOfDay = "Morning"
case 12...16:
  timeOfDay = "Afternoon"
case 17...19:
  timeOfDay = "Evening"
case 20..<24:
  timeOfDay = "Late evening"
default:
  timeOfDay = "INVALID HOUR!"
}
|
This is more succinct than writing out each value individually for all cases.
When there are multiple cases, the statement will execute the first one that matches. You’ll probably agree that this is more succinct and more clear than using an if statement for this example. It’s slightly more precise as well, because the if statement method didn’t address negative numbers, which here are correctly deemed to be invalid.
It’s also possible to match a case to a condition based on a property of the value. As you learned in the first part of this tutorial series, you can use the modulo operator to determine if an integer is even or odd. Consider this code:
let number = 10

switch number {
case let x where x % 2 == 0:
  print("Even")
default:
  print("Odd")
}
|
This will print the following:
Even
This switch statement uses the let-where syntax, meaning the case will match only when a certain condition is true. The let part binds a value to a name, while the where part provides a Boolean condition that must be true for the case to match. In this example, you’ve designed the case to match if the value is even — that is, if the value modulo 2 equals 0.
The method by which you can match values based on conditions is known as pattern matching.
In the previous example, the binding introduced a unnecessary constant x; it’s simply another name for number. You are allowed to use number in the where clause and replace the binding with an underscore to ignore it:
let number = 10

switch number {
case _ where number % 2 == 0:
  print("Even")
default:
  print("Odd")
}
|
Partial Matching
Another way you can use switch statements with matching to great effect is as follows:
let coordinates = (x: 3, y: 2, z: 5)

switch coordinates {
case (0, 0, 0): // 1
  print("Origin")
case (_, 0, 0): // 2
  print("On the x-axis.")
case (0, _, 0): // 3
  print("On the y-axis.")
case (0, 0, _): // 4
  print("On the z-axis.")
default:        // 5
  print("Somewhere in space")
}
|
This switch statement makes use of partial matching. Here’s what each case does, in order:
- Matches precisely the case where the value is
(0, 0, 0). This is the origin of 3D space.
- Matches y=0, z=0 and any value of x. This means the coordinate is on the x-axis.
- Matches x=0, z=0 and any value of y. This means the coordinate is on the y-axis.
- Matches x=0, y=0 and any value of z. This means the coordinate is on the z-axis.
- Matches the remainder of coordinates.
You’re using the underscore to mean that you don’t care about the value. If you don’t want to ignore the value, then you can bind it and use it in your switch statement, like this:
let coordinates = (x: 3, y: 2, z: 5)

switch coordinates {
case (0, 0, 0):
  print("Origin")
case (let x, 0, 0):
  print("On the x-axis at x = \(x)")
case (0, let y, 0):
  print("On the y-axis at y = \(y)")
case (0, 0, let z):
  print("On the z-axis at z = \(z)")
case let (x, y, z):
  print("Somewhere in space at x = \(x), y = \(y), z = \(z)")
}
|
Here, the axis cases use the let syntax to pull out the pertinent values. The code then prints the values using string interpolation to build the string.
Notice how you don’t need a default in this switch statement. This is because the final case is essentially the default; it matches anything, because there are no constraints on any part of the tuple. If the switch statement exhausts all possible values with its cases, then no default is necessary.
Also notice how you could use a single let to bind all values of the tuple: let (x, y, z) is the same as (let x, let y, let z).
Finally, you can use the same let-where syntax you saw earlier to match more complex cases. For example:
let coordinates = (x: 3, y: 2, z: 5)

switch coordinates {
case let (x, y, _) where y == x:
  print("Along the y = x line.")
case let (x, y, _) where y == x * x:
  print("Along the y = x^2 line.")
default:
  break
}
|
Here, you match the “y equals x” and “y equals x squared” lines.
And those are the basics of switch statements!
Mini-exercises
- Write a switch statement that takes an age as an integer and prints out the life stage related to that age. You can make up the life stages, or use my categorization as follows: 0-2 years, Infant; 3-12 years, Child; 13-19 years, Teenager; 20-39, Adult; 40-60, Middle aged; 61+, Elderly.
- Write a
switch statement that takes a tuple containing a string and an integer. The string is a name, and the integer is an age. Use the same cases that you used in the previous exercise and let syntax to print out the name followed by the life stage. For example, for myself it would print out "Matt is an adult.".
Key Points
- You can use ranges to create a sequence of numbers, incrementing to move from one value to another.
- Closed ranges include both the start and end values.
- Half-open ranges include the start value and stop one before the end value.
- For loops allow you to iterate over a range.
- The continue statement lets you finish the current iteration of a loop and begin the next iteration.
- Labeled statements let you use
break and continue on an outer loop.
- You use
switch statements to decide which code to run depending on the value of a variable or constant.
- The power of a
switch statement comes from leveraging pattern matching to compare values using complex rules.
Give these challenges a try to see if you fully understand the subtleties of loop and switch statements.
Second Challenges
- In the following
for loop:
var sum = 0
for i in 0...5 {
  sum += i
}
|
What will be the value of sum, and how many iterations will happen?
- In the
while loop below:
var aLotOfAs = ""
while aLotOfAs.characters.count < 10 {
  aLotOfAs += "a"
}
|
How many instances of the character “a” will there be in aLotOfAs? Hint: aLotOfAs.characters.count will tell you how many characters there are in the string aLotOfAs.
- Consider the following
switch statement:
switch coordinates {
case let (x, y, z) where x == y && y == z:
  print("x = y = z")
case (_, _, 0):
  print("On the x/y plane")
case (_, 0, _):
  print("On the x/z plane")
case (0, _, _):
  print("On the y/z plane")
default:
  print("Nothing special")
}
|
What will this code print when coordinates is each of the following?
let coordinates = (1, 5, 0)
let coordinates = (2, 2, 2)
let coordinates = (3, 0, 1)
let coordinates = (3, 2, 5)
let coordinates = (0, 2, 4)
|
- A closed range can never be empty. Why?
- Print a countdown from 10 to 0. (Note: do not use the
reversed() method, which will be introduced later.)
- Print 0.0, 0.1, 0.2, 0.3, 0.4, 0.5, 0.6, 0.7, 0.8, 0.9, 1.0. (Note: do not use the
stride(from:by:to:) function, which will be introduced later.)
Where to Go From Here?
You’ve learned a lot about the core language features for dealing with data over these past few tutorials — from data types to variables, then on to decision-making with Booleans and loops with ranges.
You can download the final playgrounds and challenges from the first part and second part of this tutorial here.
We encourage you to try the challenges above; if you find a particularly interesting solution to one of the challenges, or have any questions or comments on this tutorial, please tell us about it in the discussion below!
This tutorial was taken from Chapters 4 and 5 of Swift Apprentice, Second Edition available from the raywenderlich.com store.
The book has been completely updated to work with Xcode 8 and Swift 3. Check it out and let us know what you think!


 President Barack Obama and first lady Michelle Obama arrive at a Halloween event at the South Lawn.


 A child dressed up as President Barack Obama looks on during a Halloween event at the South Lawn of the White House.


